State Management
The documentation applies to: v0.9.0
State Management - Combination on Page
For an idea of manipulating data on Page, we use a State Management for handling the changes. Basically, we need to ensure no concurrent changes to update a data.
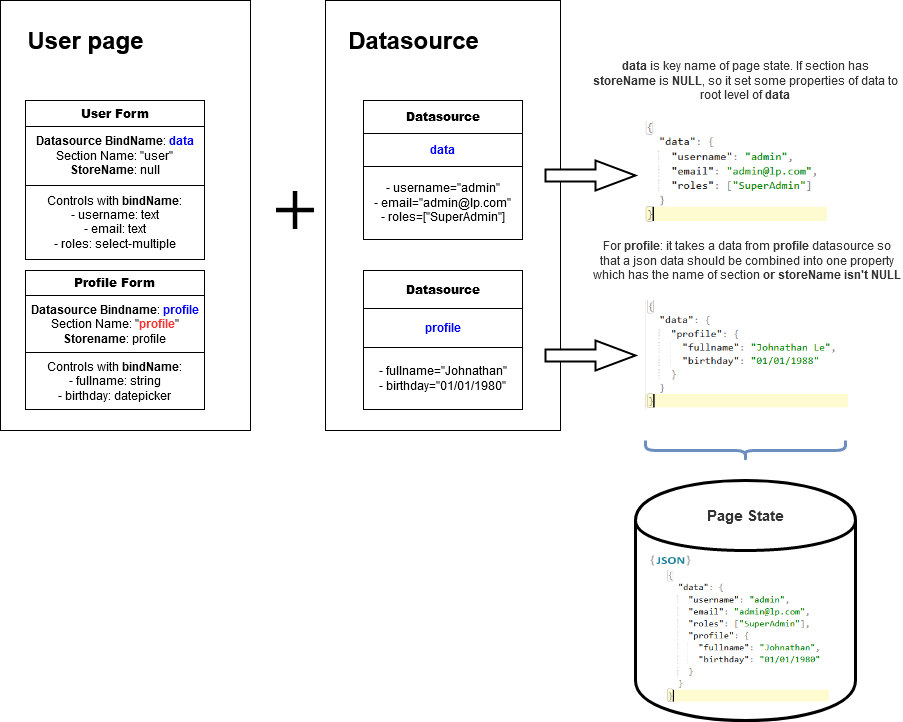
On an initial step, we will get the datasources for Page. These datasources must have an unique name. data is a key name which we store in State Management. Thus a combination of datasources is following the screenshot below:
Important
If you access to State Management, you need to access via data. data will be used everywhere on LET Portal. Thus you know clearly about a combination above, you won't get any trouble on another document.
Explanation
Now let's write down one by one step to help you understand clearly. Imagine you have the user info page which includes two sections: one is user info and one is profile. So the data value is
``` json tab="data" { "username": "admin", "email": "admin@letportal.com", "profile": { "fullName": "Johnathan Le", "birthday": "11/11/1991" } }
And the configuration of two sections are

``` json tab="userinfo"
// datasourceBindName = "data" -> Bind property value from "data" datasource
// storeName = NULL

{
    "username": {
        "type": "Textbox",
        "bindName": "username"
    },
    "email": {
        "type": "Email",
        "bindName": "email"
    }
}
``` json tab="profile" // datasourceBindName = "data" -> Bind property value from "data" datasource // storeName = "profile" -> Help to store to "profile" property in "data"
{ "fullName": { "type": "Textbox", "bindName": "fullName" }, "birthday": { "type": "Datepicker", "bindName": "birthday" } }
So each time these inputs change its value, the **data** object will be updated.
# State Management - Array on Page
On Standard Array, if `allowupdateparts` option is `false`, `data` will store two groups as `inserts` and `removes`. Otherwise, `data` will store four groups such as `fresh`, `inserts`, `removes`, `updates`.
So let's explain about the `allowupdateparts` option. This options is used to indicate a proccess way of array data:
- `allowupdateparts` is `false`: means you want to remove all and then insert all, so that you have two groups `inserts` and `removes`. LP will help you to maintain two groups until user submits. Usage: very usefull for non-reference children, means a child doesn't have any external reference to this.
- `allowupdateparts` is `true`: means you want to update a few children, remove few children and insert a few children. So that you have four groups `fresh`, `inserts`, `removes` and `updates`. Usage: very useful for optimizing performance, and a child has external references to this.
- `fresh`: contains all initial children data that are received from datasource. After that, each action on array will move one item from this list to `inserts`, `removes`, `updates` regarding action type.
- `inserts`: When user add one item, it will be added into this group
- `removes`: When user remove one item, it will be added into this group
- `updates`: When user update one item which has been on `fresh`, it will be moved to this group. Otherwise, a new item on `inserts` will be updated instead.
We will discuss later about how to use these groups on Page Button.

!!! warning "Restriction"
State Management supports only Standard section, we don't find any use-cases for Dynamic List or Chart. If you have any idea, please feedback to us.
# State Management - Tree
If you want to manipulate the data that looks like **tree**, this feature is for you.

Let take a look on an sample of the **nest** data below:
``` json tab="Menu"
[
{
"name": "Core",
"url": "#",
"sub": [
{
"name": "Apps",
"url": "/apps"
},
{
"name": "Pages",
"url": "/pages"
},
]
},
{
"name": "Builder",
"url": "/builder"
}
]
You want to the data can be add/remove/update one child element by constructing to Tree component.
Based on the data structure, Tree must be configurated by these settings below.
json tab="Options"
{
    // Define the in data structure is nest data. Accepted value: nest|flat
    "indatastructure": "nest",
    // Define the out data structure is nest data, it will be stored in the data state. Accepted value: nest|flat
    "outdatastructure": "nest",
    // Field will be used to display as name in Tree
    "displayname": "name",
    // Reference to the property name of array. Help to lookup the children data
    "inchildren": "sub",
    // Reference to the property name of array. It is the name of array property of data state.
    "outchildren": "sub"
}
You can open the App Menu Builder page to understand how these options work.